Our kitchen isn’t exactly lacking in gadgets. The lovely Kitchen Aid artisan stand mixer, food processor, Belgian waffle iron, juicer, Hawaiian shave ice maker, etc. My tendency, however, is to use these things frequently as soon as we get them, only to use them less and less often as time goes by. One thing that hasn’t lost its intrigue thus far is the Babycakes Pie Maker my mom sent me for my 27th birthday. I love this device. You get home-baked pies without having to turn on your oven, thus keeping the house from getting too hot even in the middle of summer. I know you can make mini pies with a regular ‘ole cupcake pan, but that still requires heating your whole house.
Up until this last recipe, I had been making double-crusted pies. I finally figured out recently though, that single, bottom-crusted pies, are so simple. As it turns out, not reading the direction manual very closely isn’t the smartest way to go. Turns out I’ve been doing it all wrong. You’re supposed to start off with the pie maker unplugged (and cool), no preheating! This makes things much simpler, by the way! The only real downside is waiting for the pie maker to cool back off between batches of pies.
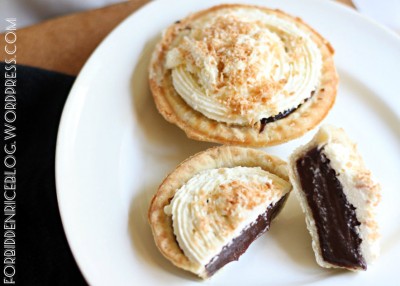
That aside, this recipe for chocolate pudding pie is tasty. And cute when they’re assembled. And who doesn’t enjoy eating good tasting, cute looking desserts? Seriously. The crust is reminiscent of my favorite macadamia nut shortbread, which I love to use for lemon bars. The chocolate pudding? I loosely based it on my husband’s grandmother’s recipe. Use a good quality cocoa; it makes all the difference in your final product. As I am assuming with most of the recipes I use for my Babycakes maker, I reckon you could make a full size pie (8 or 9-inch), simply altering the amount of ingredients. I have not tried that personally, but am nearly positive you could double the following recipe and be set! :)
Mini Chocolate Pies with Macadamia Coconut Crusts
Ingredients:
For the crusts:
1½ cups all-purpose flour
3 tbsp. powdered sugar
a pinch of salt
2 tbsp. unsweetened shredded coconut
¼ cup raw macadamia nuts, chopped fine
1 stick unsalted butter
6-10 tbsp. ice cold water
For the filling:
¾ cup pure cane sugar
¼ cup unsweetened cocoa powder
3 tbsp. all-purpose flour
1 tbsp. cornstarch or arrowroot powder
¼ tsp. sea salt
1½ cups milk (any kind you’ve got available)
2 egg yolks
1 tsp. pure vanilla extract
2 tbsp. unsalted butter
For the topping:
8 oz. heavy whipping cream
2 tbsp. powdered sugar
½ – 1 tsp. vanilla extract
¼ cup unsweetened shredded coconut, toasted *
1 tbsp. canola or vegetable oil
* With such a small amount of coconut to toast, I like to do this in our toaster oven. I layer the coconut in a single layer on a small baking sheet, then bake at 300° for about 7-10 minutes, paying close attention to make sure the coconut doesn’t burn (it will, quickly). Allow the toasted coconut to cool completely before using.
Directions:
Prepare the dough for your crusts: In a bowl, mix together the flour, powdered sugar, salt, unsweetened coconut and raw macadamia nuts. Use a box grater to grate in the unsalted butter. Use your hands or two butter knives to mix in the butter, until your flour mixture resembles very coarse crumbs. Add in about 6 tablespoons of cold water, mixing with a fork. Continue adding the ice cold water one tablespoon at a time, until you have a soft but not overly sticky ball of dough. Wrap in plastic wrap and refrigerate for at least 1 hour, but no more than 24 hours.
Prepare the crusts: Once the dough has cooled for at least an hour, roll it out to about 1/8-inch thick (thinner than a full-size pie crust) on a lightly floured surface. Use the pie cutting tool included with the Babycakes Pie Maker, cutting the larger circles for bottom crusts. You should be able to get at least 10 crusts out of the dough. Lightly brush the wells of your pie maker with the oil. Use the pie-pressing tool, placing four of the dough rounds into the pie maker. Prick all over the dough with a fork (keeping it from puffing up while cooking. Close the pie maker until it locks, then plug in and bake for 12-14 minutes, until the crusts are lightly brown and crisp. Unplug the pie maker, transfer the crusts to a wire cooling rack until completely cooled, then repeat the above cooking process until all the dough is used. Be sure to allow the pie maker time to cool completely between each batch!
Prepare the filling: While the crusts are cooling, whisk together the sugar, unsweetened cocoa, flour, cornstarch and salt in a small saucepan. Turn the heat on to medium and whisk in the milk. Continue stirring until the mixture begins to thicken (15 – 20 minutes). While the chocolate pudding is cooking, whisk together the egg yolks and vanilla in a small container. Add a tablespoon of the chocolate to the egg mixture, whisking continuously (keeping the eggs from cooking). Remove the pudding from the heat once it’s very thick. Whisk in the egg mixture, stirring continuously. Stir in the butter.
Prepare the pies: Spoon about 3 tablespoons of chocolate pudding into each pie crust, or just enough filling to be slightly rounded on the top. You can use a butter knife to smooth the top if you want. Place all the filled pies on a baking sheet.
In a bowl, whisk together the heavy cream, powdered sugar, and vanilla until thick and to the consistency of whipped cream. Top each of the pies with a generous amount of whipped cream and a light sprinkling of your toasted coconut. Refrigerate at least 30 minutes before serving.
Makes 10-12 mini pies.


Looks delicious! I would so love to try some. I am sure it tastes fantastic.
These mini pies look delicious! Thanks for sharing!
-Shannon, The Crumb Cake Queen